1. When the sky is overcast, it’s a great day for waterfall photography.


Even better than when it’s sunny sometimes. Much of the time when you’re photographing a waterfall you will be in a river canyon. If the sky is clear, the top of the waterfall will likely be in intense sunshine while the bottom will be in deep shadow. The difference in the intensity of the light between the two parts of the scene can be greater than the sensor in your camera can handle. On a sunny day,either the water will be completely blown out (pure white with no detail) or the surrounding area will be way to dark (again, no detail). On an overcast day, the illumination will be more even making it easier to get a good exposure. Another trick if it’s sunny, compose your image eliminating much or all of the sky above the falls. Try cropping the image with your camera rather than later with your computer. By doing this, the overall illumination of the scene might even out enough to give you a good image.
2. The light fades quickly in a canyon, even at the height of summer.
The deeper the canyon the sooner the light will fade. There are places here in Oregon where you can loose the light by three or four in the afternoon even on a long summer day. Of course you can keep working but be aware that the quality of the light is going to change, it’s going to get cooler, (that goes for the outside temperature as well). The difference in the intensity of the light will increase for a while until the sun gets closer to setting. As the sun gets lower in the sky the light becomes less intense. There’s a period of time in late afternoon, early evening, when the light will even out a little. It doesn’t last long. Depending on the scene, a graduated nuetral density filter can sometimes help.
3. Use a tripod.
There are two good reasons for doing this.


First, you might want to use a longer shutter speed to get a blurry effect in the water to help illustrate movement. Everybody does this to the point where it has become a cliché IMHO. Don’t let that stop you – I don’t. Sometimes that effect seems to work well for a given scene. Sometimes it doesn’t. You have to slow your shutter speed way down to make this work. I use a shutter speed of about a tenth of a second or slower. It takes the support of a tripod to create an image in this way, otherwise everything is blurry not just the moving water.
Second, if it’s a sunny day, you can set-up your shot, expose for the water, take another shot exposing for the shadows, take a few shots either side of these two exposures, and use High Dynamic Range tools in post to create a properly exposed HDR composite image. I’ve been able to brace my camera against a rock or a tree or some other solid object to solve the first of these two problems. That ad hoc kind of camera support never works in solving the second problem.


(Note: before you settle on HDR as your method of choice, take a close look at the scene in front of you. Even with a small waterfall the water can be cascading down with quite a bit of energy. You may see ferns, tree leaves, and other vegetation moving back and forth as a result of the breezes created by the falls. This can lead to blur and/or make it difficult to get a good HDR image. If you want the vegetation in your image to be sharp you may need to consider a different approach. There’s a great YouTube video on this topic. I’ll put a link at the end of this post.)
4. Take a neutral density filter and a polarizing filter with you.
In order to get my shutter speed down to a tenth of a second or so I sometimes have to crank the ISO as low as it will go and stop the lens down as small as possible. Sometime this isn’t enough and part of the scene is still blown out. A neutral density filter will help reduce the amount of light entering the lens in a case like this. I use the Lee filter system. Their Little Stopper usually does the trick for me. I take the Big Stopper with me too sometimes just in case. The good thing about the Lee system is that it is very high quality. The inconvienient thing is that you must use a filter holder instead of just screwing the filter directly on to your lens, so more parts to keep track of.
Often, the light is even enough in intensity that you don’t need to cut it with an ND filter. Also, you may want a little sky showing in your image. A polarizing filter might provide just enough light reduction to get your shutter speed down and give you a deeper blue sky as part of the deal. It’s easy to carry along a PL filter and an extra battery with me so I always do.
5. Take your lens cleaning kit with you.
Falling water = mist and spray. Walking around and under waterfalls, the chances of getting water on your lens are about one hundred percent. I’ve also inadvertently gotten dust and pollen on my lens just hiking through the forest to get to a waterfall. A soft dry lens cleaning cloth is your best bet in keeping your lens clean and dry. Some lens cleaning fluid and a dusting brush are a good idea as well.
6. Generally, shorter focal lengths work out better.
My go to lens for waterfall photography is my Nikon 24-70mm f/2.8 zoom. I have the version without Vibration Reduction (VR) which isn’t a problem for me as I take along a tripod (see tip #3). I’ll swap that for my 28-300mm zoom/tele if the area is a little more open or I can’t get as close to the falls. I don’t think this lens is a sharp as the 24-70 but the wider range of focal lengths often comes in handy. I grab my 105mm Macro in addition to one of the other two just mentioned as there’s always something I want to get closer to around the water, wildflowers in the spring, for example. Longer lenses just don’t work well in the close confines of a river canyon and who needs the extra weight when you are hiking?
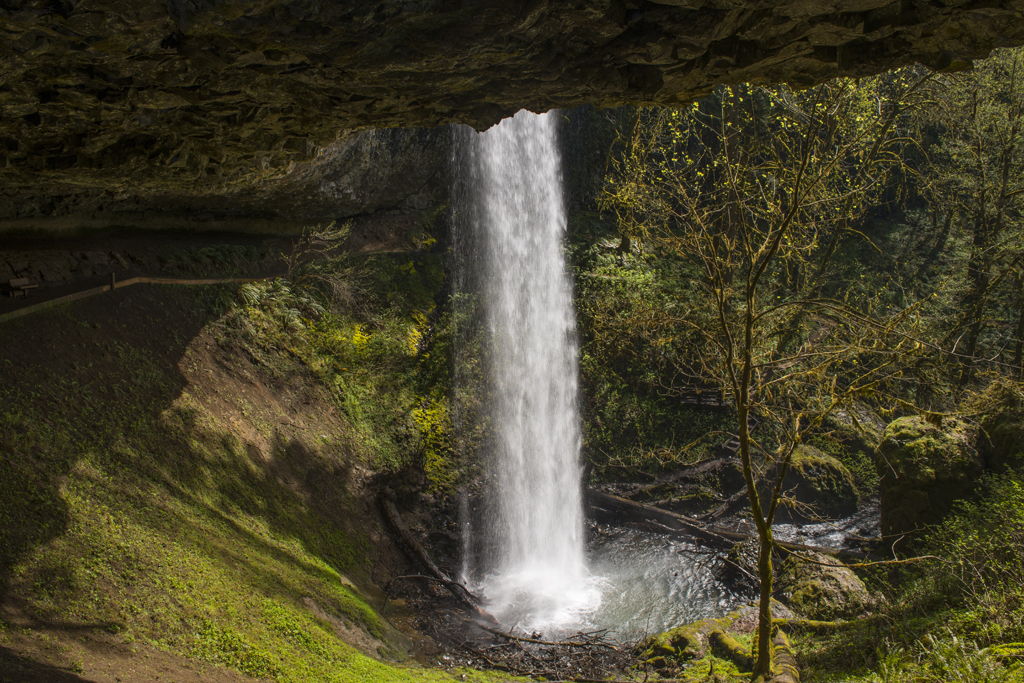
7. Try different angles for your shot.
Many trails leading to waterfalls, especially the more popular ones, are well traveled. In fact, you can usually clearly see where other photographers, have positioned themselves to take a picture. If you use only these well-worn spots, you’ll have created an image that’s pretty much like everyone else’s. When you can safely do it, try to find a viewpoint that’s different from the more obvious ones. I’m not advocating you ignore warning signs, trespass, or risk life and limb just to get a shot. A lot of times, even a small move like shooting from a lower angle, can make a big difference. I’ve been to some falls where honestly, the river canyon is as interesting as the falls themselves. Huge boulders covered with moss, ancient downed trees that form a narrow bridge across the river, deep shadows on the canyon walls, all create an atmosphere that makes you feel like an Ewok.

8. To everything there is a season – waterfalls included.


These two waterfall images were made at about the same time of year from the same place. As you can see by comparing them, from one year to the next, one season to the next, even from one week to the next objects in the natural world change. A waterfall that in summer may have a gentle, almost serene flow, in late winter and early spring may be a thundering torrent. As you plan your photographic explorations keep this fact in mind. For instance you might want to plan for waterfalls in late winter, early spring, cloudy days are okay, and bird photography during spring migration and mating season. Staying in touch with the rythms of the seasons will help you be in the right place at the right time to make the most of your image making opportunities.
9. Be truthful.
Try to edit sparingly, let Mother Nature do the talking. With the power of image editing tools like Photoshop, it’s become easier and easier to manipulate an image. The temptation sometimes take us too far. It’s all about choices. If you spend hours editing an image perhaps you need to re-evaluate some of your decisions in the field when you made the image. One of the best things about digital photography and editing our own images is what we learn from our experience. Some people apply this only to the editing part of their workflow. Apply what you are learning sooner in the process. As much as possible, make images with your camera and not your computer. Be truthful and be a better photographer.
10. Have some fun!
Have some fun out there! This is one time when your smart phone can be just about as much fun as your DSLR. When I’ve taken my stills, I grab my iPhone and do pano’s, slow motion or a video. I know I can do all that with my camera. Except for making a video, the other stuff is kind of a pain with a DSLR. It so easy to whip out the smart phone and take a pano or a short slo mo to send to the wife to let her know where I’m at and that I’m still working. I’ve not created anything with my phone I’m going to put on my web site, but you never know. It’s fun cutting loose every now and then and doing something different. Helps me slow down, remember to appreciate where I’m at, and see things from a fresh perspective.
And some links for more information:
My personal nature photography hero Steve Perry:
Photoshop Waterfall Tricks